


However, selecting an industrial inspection lens involves more than choosing a focal length or megapixel rating. Engineers need to consider the inspection task, smallest detectable defect, sensor size, field of view (FOV), working distance, optical resolution, distortion, aperture, depth of field, and installation environment.
This guide explains how to select an appropriate lens for industrial inspection, compare essential optical parameters, avoid common selection mistakes, and identify a suitable lens configuration for different inspection applications.
1. Define Your Industrial Inspection Requirements First
Before comparing lens specifications, define what the vision system must detect, measure, or identify. A lens suitable for general presence detection may not provide sufficient image quality for precision dimensional measurement or microscopic surface-defect inspection.
Identify the Inspection Task
Industrial inspection applications generally fall into several categories:
- Surface defect detection: Identifying scratches, cracks, dents, contamination, and other visible defects.
- Dimensional measurement: Measuring lengths, diameters, gaps, positions, and geometric tolerances.
- Component inspection: Checking assembly completeness, component orientation, and product positioning.
- Code and character recognition: Reading barcodes, QR codes, serial numbers, and printed characters.
- Automated optical inspection (AOI): Inspecting electronic components, PCB assemblies, solder joints, and other manufactured products.
- Robot guidance: Locating objects and providing position information for automated picking, placement, and handling.
Each task places different demands on the optical system. Surface inspection may require strong contrast and sufficient detail to reveal small defects. Dimensional measurement places greater emphasis on geometric accuracy and calibration. Robot guidance may prioritize field of view, positioning accuracy, and stable image quality.
For application-specific considerations, explore TOWIN’s machine vision lens solutions and lenses for automated optical inspection.
Determine the Smallest Feature or Defect to Detect
The smallest feature that must be detected is one of the most important inputs in lens selection. Knowing only the overall object size is not enough. A camera may capture an entire metal component clearly while still failing to reveal a tiny scratch or crack.
For example, an inspection system may need to capture a 100 mm-wide metal part while detecting surface defects as small as 0.2 mm. The optical system must provide both sufficient coverage and enough image detail to distinguish those defects under actual operating conditions.
Record the following information before selecting a lens:
- Maximum object dimensions and required inspection area.
- Smallest defect or feature that must be detected.
- Required measurement accuracy, if dimensional inspection is involved.
- Camera sensor size, resolution, and pixel pitch.
- Available working distance and installation space.
- Lighting conditions, object movement, and environmental constraints.
These requirements establish the foundation for the rest of the selection process.
2. Compare the Key Parameters of an Industrial Inspection Lens
A suitable lens must match the camera and inspection task as a complete optical system. The following parameters should be evaluated together rather than considered independently.
| Parameter | What to Check | Why It Matters |
|---|---|---|
| Sensor size and image circle | Sensor format and lens image-circle coverage | Prevents vignetting and incomplete image coverage. |
| Field of view (FOV) | Required horizontal and vertical coverage | Ensures the entire inspection area fits within the image. |
| Working distance (WD) | Distance from the lens to the inspection target | Constrains focal length selection and mechanical installation. |
| Optical resolution | Lens resolving power relative to sensor pixel pitch and required detail | Helps preserve fine features and defect information. |
| Distortion | Acceptable geometric deviation for the application | Affects dimensional measurement and geometric analysis. |
| Aperture and depth of field | Available light, exposure time, and target height variation | Influences brightness, sharpness, and the range of acceptable focus. |
| Lens mount and mechanics | Mount interface, dimensions, and focus adjustment | Ensures camera compatibility and reliable installation. |
| Operating environment | Lighting spectrum, temperature, vibration, dust, and moisture | Helps ensure stable imaging under real production conditions. |
2.1 Match the Lens to the Camera Sensor
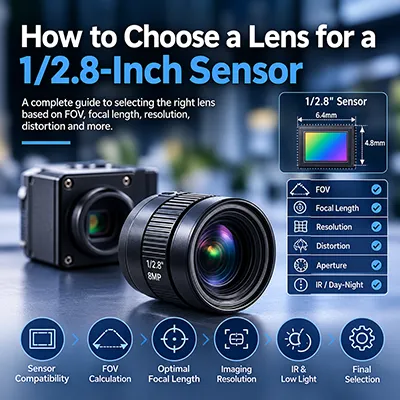
The lens must provide an image circle that adequately covers the camera sensor. If the sensor is larger than the lens’s supported image format, the image may show dark corners or incomplete coverage.
Sensor size also affects the relationship between focal length and field of view. Therefore, the same focal length can produce different viewing areas when used with different sensor formats.
Resolution must also be evaluated carefully. A camera’s megapixel count alone does not determine whether a lens can resolve the smallest required feature. Lens MTF performance, sensor pixel pitch, contrast, aperture, and the complete imaging setup all influence usable detail.
Learn more about industrial camera sensor sizes and lens compatibility before finalizing the optical configuration.
2.2 Calculate the Required Field of View
Field of view describes the physical area captured by the camera and lens combination. The required FOV should include the entire target and any additional margin needed for positioning variation or inspection movement.
For example, if a component measures 100 × 80 mm, the inspection system may need a field of view slightly larger than those dimensions. The final coverage depends on how the component is positioned, how much variation is expected, and whether the system must inspect multiple features simultaneously.
Use the TOWIN FOV Calculator to estimate the required field of view. If the target coverage, sensor size, and working distance are already known, the Focal Length Calculator can help estimate a suitable starting focal length.
Remember that calculated values are initial estimates. The selected lens must still be checked against its actual optical specifications and tested in the intended configuration.
2.3 Verify Optical Resolution and Defect Visibility
For industrial inspection, resolution is not simply a matter of choosing the highest megapixel rating. The complete system must provide enough spatial detail and contrast for the image-processing algorithm or inspection operator to identify the target feature reliably.
As a preliminary estimate, consider how many pixels will represent the smallest defect. If a 0.2 mm defect spans only a fraction of a pixel, reliable detection will generally be difficult. If it spans several pixels, detection may become more practical, depending on contrast, orientation, optics, lighting, and the algorithm used.
There is no universal pixel-count threshold for every inspection task. A defect’s visibility depends on its shape, contrast against the background, imaging noise, optical transfer performance, and the required detection confidence.
Read the guide to how resolution influences lens choice to understand how camera and lens performance affect the visibility of fine details.
2.4 Evaluate Distortion and Measurement Accuracy
Optical distortion changes the geometric relationship between an object’s real dimensions and its image. For general presence detection, some distortion may be acceptable. For dimensional measurement, precision positioning, and geometric inspection, distortion may introduce unacceptable errors if it is not controlled or properly calibrated.
A low-distortion lens can help maintain geometric consistency across the image. However, lens distortion is only one source of measurement error. Camera calibration, lens mounting, perspective effects, lighting, focus, mechanical stability, and the measurement algorithm must also be considered.
For demanding measurement applications, explore TOWIN low-distortion lenses and read the industrial lens distortion guide.
2.5 Consider Aperture and Depth of Field
Aperture controls the amount of light passing through the lens and influences depth of field. A wider aperture can help capture brighter images or support shorter exposure times, which may be useful when inspecting moving products.
However, a wider aperture generally provides less depth of field. If the target surface contains different heights or the working distance varies, the inspection system may need more depth of field to keep the relevant features acceptably sharp.
Stopping down the aperture can increase depth of field, but it reduces the amount of light reaching the sensor and may introduce diffraction-related loss of fine detail at small apertures. The optimal setting depends on the lens, sensor, lighting, exposure time, and inspection requirements.
For further background, see TOWIN’s optical design and image quality resources.
3. Choose a Lens Type Based on the Inspection Application
Different industrial inspection tasks require different optical characteristics. The following comparison provides a starting point for narrowing down suitable lens categories.
| Inspection Application | Key Optical Requirements | Lens Selection Direction |
|---|---|---|
| Surface defect detection | Fine-detail imaging, suitable contrast, and consistent sharpness | Choose a lens with adequate resolving power for the smallest defect. |
| Dimensional measurement | Controlled distortion, stable geometry, and calibration support | Consider low-distortion optics or telecentric designs when justified by the tolerance requirements. |
| PCB and electronic component inspection | Fine detail, edge clarity, and coverage of small components | Evaluate industrial machine vision lenses with appropriate resolution and sensor coverage. |
| Robot guidance | Suitable FOV, reliable feature localization, and installation flexibility | Balance coverage and resolution against the robot’s working distance. |
| Compact embedded inspection | Small dimensions, appropriate FOV, and integration flexibility | Consider compact M12 lenses. |
| High-resolution industrial inspection | Large image-circle coverage and adequate optical resolving power | Evaluate suitable C-Mount industrial lenses. |
| Camera and security inspection systems | Camera compatibility, required coverage, and application-specific imaging performance | Consider suitable CS-Mount lenses where the camera interface and optical requirements match. |
These categories are not interchangeable recommendations for every project. The correct choice depends on the camera, target, installation geometry, and required image quality. Confirm the actual lens specifications before making a final selection.
4. How to Select a Lens for Industrial Inspection Step by Step
A structured selection process helps engineers avoid choosing a lens based on a single specification. Follow these steps to narrow the options and validate the final configuration.
Step 1: Define the Inspection Objective
Identify whether the system needs to detect defects, measure dimensions, recognize characters, check assembly completeness, or guide a robot. Specify the smallest feature that must be inspected and the acceptable error rate or measurement tolerance.
This step establishes the required image detail and helps determine whether geometric accuracy, depth of field, or wide-area coverage is the primary concern.
Step 2: Confirm the Camera Sensor
Record the sensor format, resolution, pixel pitch, and available camera interface. Check that the lens image circle covers the sensor and that its optical performance is suitable for the required detail.
Do not rely on megapixel labels alone. Two lenses with the same nominal resolution rating may perform differently across the image field, at different apertures, or under different working conditions.
Step 3: Determine the Required FOV and Working Distance
Measure the target dimensions and determine the coverage required for inspection. Then establish the available distance between the lens and the object, taking account of machine guards, lighting, moving parts, and mechanical restrictions.
Use these inputs to estimate the required focal length. If the working distance cannot change, the optical design must accommodate that fixed constraint while providing sufficient coverage and image detail.
Step 4: Establish the Required Image Detail
Estimate how the smallest defect or feature will be represented on the sensor. Evaluate the combination of pixel pitch, field of view, lens resolving power, image contrast, and lighting conditions.
For example, if the system must detect tiny surface scratches, a lens that captures the entire part but produces low contrast at the defect scale may not be suitable. Test images of representative defects are more informative than megapixel specifications alone.
Step 5: Set Distortion and Measurement Requirements
For presence detection or broad classification, the distortion requirement may be relatively flexible. For dimensional measurement or precise positioning, establish a geometric error budget and determine how much distortion the lens and calibration process can tolerate.
If perspective changes caused by object height are significant, a telecentric lens may be worth evaluating. Telecentric optics are not automatically necessary for every precision application; their suitability depends on the object dimensions, working distance, field of view, depth variation, and cost constraints.
Step 6: Verify Aperture, Mount, and Environment
Check whether the lens can deliver sufficient light at the required exposure time, maintain adequate depth of field, and fit the camera’s mechanical interface. Consider vibration, temperature, dust, moisture, and the spectral characteristics of the lighting system.
For infrared imaging or applications using multiple illumination wavelengths, confirm that the lens is designed for the relevant spectral range and focus requirements.
Step 7: Validate the Lens Under Real Inspection Conditions
Before committing to mass production, test the candidate lens with the actual camera, lighting, working distance, and inspection target. Include representative good products and known defects whenever possible.
Evaluate image sharpness across the field, smallest-feature visibility, measurement repeatability, exposure time, focus stability, and inspection algorithm performance. A lens that works well on a laboratory target may behave differently under production-line conditions.
For a broader overview of the selection workflow, refer to the TOWIN Lens Selection Guide.
5. Practical Example: Selecting a Lens for Metal Surface Inspection
Consider an automated inspection system designed to inspect metal components for scratches and other surface defects.
| Requirement | Example Specification | Selection Implication |
|---|---|---|
| Object size | 100 × 80 mm | Define an FOV that covers the component with a suitable margin. |
| Smallest defect | 0.2 mm | Verify that the complete imaging system can reveal the defect reliably. |
| Working distance | Restricted by the machine layout | Calculate the focal length around the available installation distance. |
| Inspection objective | Surface-defect detection | Prioritize detail visibility, contrast, focus, and appropriate lighting. |
| Measurement requirement | Depends on the inspection specification | Evaluate distortion and calibration if dimensions are also measured. |
In this example, the first step is not to select a lens based only on the 100 × 80 mm object dimensions. The engineer must also determine how the 0.2 mm defect will appear in the captured image and whether its contrast is sufficient for reliable detection.
Next, the sensor format and working distance are used to estimate the focal length needed for the required FOV. The lens must then be evaluated for optical resolution, image-circle coverage, distortion, and depth of field.
Lighting is equally important. Scratches on reflective metal may be difficult to distinguish under uniform illumination, even with a suitable lens. Diffuse, directional, or low-angle illumination may reveal surface defects more effectively, depending on the surface finish and defect geometry.
The final configuration should therefore be selected through a combination of optical calculations and practical image testing, rather than by focal length or resolution rating alone.
6. Common Mistakes to Avoid When Selecting an Inspection Lens
Choosing a Lens Based Only on Megapixels
A high megapixel count does not guarantee that the smallest defects will be visible. Check lens resolving power, pixel pitch, contrast, aperture, and performance across the required image field.
Ignoring the Smallest Defect Size
Designing around the overall object dimensions can result in an image that covers the entire target but lacks the detail needed for inspection. Define the smallest feature first and confirm that the system can capture it reliably.
Using FOV as the Only Selection Criterion
A lens may provide the required coverage but still have unsuitable resolution, distortion, image-circle coverage, or depth of field. Always evaluate the complete optical configuration.
Overlooking Distortion in Measurement Applications
Excessive geometric distortion can affect dimensional measurements and positioning. Establish the accuracy requirement before deciding whether a standard lens, low-distortion lens, or telecentric design is appropriate.
Skipping Real-World Testing
Optical specifications are essential, but the final result also depends on lighting, exposure, target movement, focus, mechanical alignment, and image processing. Validate the selected lens using representative production conditions.
7. Frequently Asked Questions
Q1: How do I choose a lens for industrial inspection?
A: Start by defining the inspection task and smallest feature to detect. Then match the lens to the camera sensor, required field of view, working distance, optical resolution, distortion tolerance, aperture, and mechanical interface. Validate the final configuration under real inspection conditions.
Q2: What is the most important parameter when selecting an industrial inspection lens?
A: There is no single parameter that is most important for every application. Smallest-feature visibility is critical for defect detection, while distortion and calibration may be more important for dimensional measurement. Sensor compatibility, FOV, working distance, and resolution must also be considered.
Q3: How do I select a lens based on the smallest defect size?
A: Estimate how much of the sensor the defect will occupy based on the required FOV and sensor resolution. Then verify that the lens can resolve the feature with sufficient contrast. The required pixel coverage depends on the defect’s shape, contrast, lighting, image noise, and detection algorithm, so practical testing is recommended.
Q4: Is a higher-megapixel lens always better for industrial inspection?
A: No. A higher nominal megapixel rating does not automatically produce better inspection results. The lens must provide suitable optical resolution for the camera’s pixel pitch and the application’s required detail. Field coverage, distortion, aperture, and actual imaging performance also matter.
Q5: When should I use a low-distortion lens?
A: A low-distortion lens is worth considering when the application involves dimensional measurement, precision positioning, geometric analysis, or other tasks sensitive to image deformation. The required distortion level should be derived from the application’s accuracy tolerance and the complete calibration process.
Q6: What is the difference between M12 and C-Mount lenses for inspection?
A: M12 lenses are commonly used in compact embedded vision systems, while C-Mount lenses are widely used in industrial cameras and machine vision setups. The best choice depends on the camera interface, sensor size, required resolution, field of view, mechanical space, and application. Neither mount type guarantees better performance on its own.
Q7: Should I choose a telecentric lens for precision inspection?
A: A telecentric lens can help reduce magnification changes caused by object-distance variation and is useful for certain high-precision measurement tasks. However, it is not necessary for every inspection system. Consider the required accuracy, object size, working distance, field of view, and budget before selecting a telecentric design.
Q8: Can TOWIN help with a custom industrial inspection lens?
A: Yes. If standard lens options cannot meet your sensor, FOV, working distance, resolution, distortion, mechanical, or environmental requirements, you can share your camera specifications and inspection conditions with the TOWIN team to discuss a suitable lens solution.
8. Conclusion: Find the Right Lens for Industrial Inspection
Selecting the right Lens for Industrial Inspection requires matching optical performance to the actual inspection task. Instead of choosing a lens based only on focal length, sensor format, or megapixel rating, define the smallest defect, required field of view, working distance, resolution, distortion tolerance, depth of field, and environmental conditions first.
A structured selection process helps engineers narrow down suitable lens options, reduce unnecessary redesign, and improve inspection reliability. Use the FOV Calculator and Focal Length Calculator for initial estimates, then review the relevant C-Mount lenses, M12 lenses, and low-distortion lens options according to your application requirements.
For the most reliable result, test the selected lens with the intended camera, lighting, target, and inspection process. If your project has demanding optical or mechanical requirements, contact TOWIN to discuss an industrial lens solution tailored to your inspection system.