
Are wide-angle lens suitable for portraits?
08/06/2025
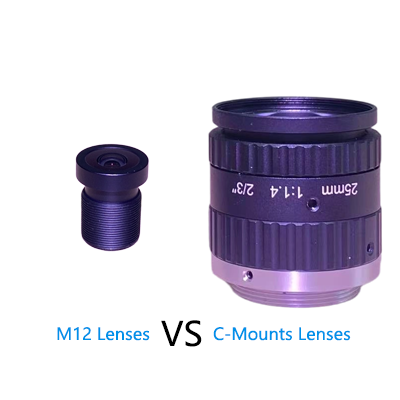
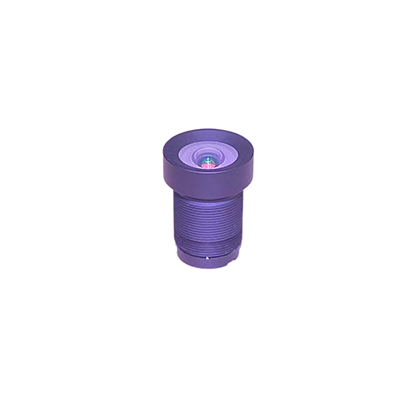
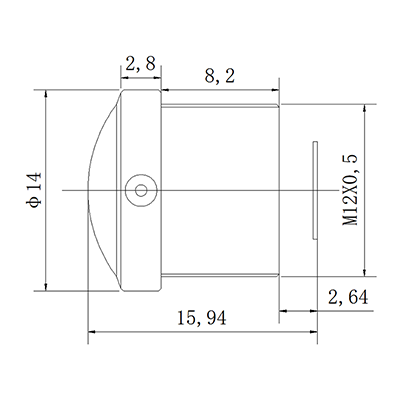
IR Cut Filter S-Mount Lens
08/07/2025
Macro photography invites us into a miniature universe, where every detail tells a story. At the heart of capturing these intricate worlds lies a fundamental concept: Aperture. Understanding and mastering Aperture techniques can transform your macro images from ordinary to extraordinary, revealing textures and patterns invisible to the naked eye.
Aperture Essentials: The Foundation of Macro Mastery
Before diving into techniques, let’s clarify what Aperture is. In photography, Aperture refers to the opening in a lens through which light passes to enter the camera. It’s measured in f-stops (e.g., f/2.8, f/8, f/16), with lower numbers indicating a wider opening and higher numbers a narrower one. Aperture plays a dual role in macro photography: it controls the amount of light reaching the sensor and influences the depth of field (DoF) – the range of distance within a photo that appears acceptably sharp.
1. Maximize Depth of Field for Comprehensive Detail
One of the most common challenges in macro photography is achieving sufficient DoF. Due to the proximity to the subject, even small Aperture adjustments can significantly impact the sharpness of different parts of the image. To capture as much detail as possible, opt for a smaller Aperture (higher f-number, such as f/16 or f/22). This technique ensures that more elements, from the foreground to the background, remain in focus, making it ideal for photographing flat subjects like leaves, flowers, or stamps.
However, be mindful that smaller Apertures reduce the amount of light entering the camera, potentially necessitating longer exposure times or higher ISO settings. Using a tripod becomes crucial to prevent camera shake and maintain image clarity.

How Aperture Affects Your Photos
2. Isolate Subjects with Shallow Depth of Field
Conversely, using a larger Aperture (lower f-number, like f/2.8 or f/4) creates a shallow DoF, effectively isolating the subject from its surroundings. This technique is particularly effective when you want to draw attention to a specific part of the image, such as the intricate patterns on an insect’s wing or the delicate veins of a petal. The blurred background, often referred to as “bokeh,” adds a dreamy, artistic quality to your photos, enhancing their visual appeal.
To achieve the best results, position your subject carefully and experiment with different Aperture settings to find the perfect balance between focus and blur.
3. Leverage Aperture for Creative Lighting Effects
Aperture doesn’t just control DoF; it also influences how light interacts with your subject. By adjusting the Aperture, you can create striking lighting effects that add depth and dimension to your macro images. For instance, a wider Aperture allows more light to enter, which can be used to highlight textures or create a soft, ethereal glow around the subject. On the other hand, a narrower Aperture can produce sunbursts or starbursts when photographing subjects with strong light sources, such as the sun or artificial lights.
Experiment with different lighting conditions and Aperture settings to discover unique effects that enhance the mood and atmosphere of your photos.
4. Combine Aperture with Focus Stacking for Ultimate Sharpness
Focus stacking is a technique that involves taking multiple photos of the same subject at different focus distances and then combining them into a single image with extended DoF. This method is particularly useful in macro photography, where achieving sufficient DoF with a single shot can be challenging. By using a consistent Aperture across all shots and varying the focus point, you can capture every detail of the subject without compromising on image quality.
Post-processing software like Adobe Photoshop or Helicon Focus can then merge these images, resulting in a final photo with exceptional sharpness and clarity. For more tips and tutorials on focus stacking, consider exploring resources like Cambridge in Colour, a reputable photography education website.

How Aperture Influences Sharpness
5. Understand the Limitations and Trade-offs of Aperture Choices
While Aperture is a powerful tool in macro photography, it’s essential to recognize its limitations and the trade-offs involved. For instance, using a very small Aperture may increase DoF but can also introduce diffraction, a phenomenon that reduces image sharpness. Similarly, a very wide Aperture may create beautiful bokeh but can make it difficult to keep the entire subject in focus.Recommended Reading:Does aperture affect image sharpness?
The key is to find a balance that suits your specific shooting scenario and creative vision. Practice with different Aperture settings, analyze the results, and adjust your approach based on what you learn.
In conclusion, mastering Aperture techniques is crucial for achieving stunning macro photography. By understanding how Aperture affects DoF, light, and image quality, you can unlock a world of creative possibilities and capture breathtaking close-up shots. Remember, practice is key to refinement, so don’t hesitate to experiment and push the boundaries of your macro photography skills.